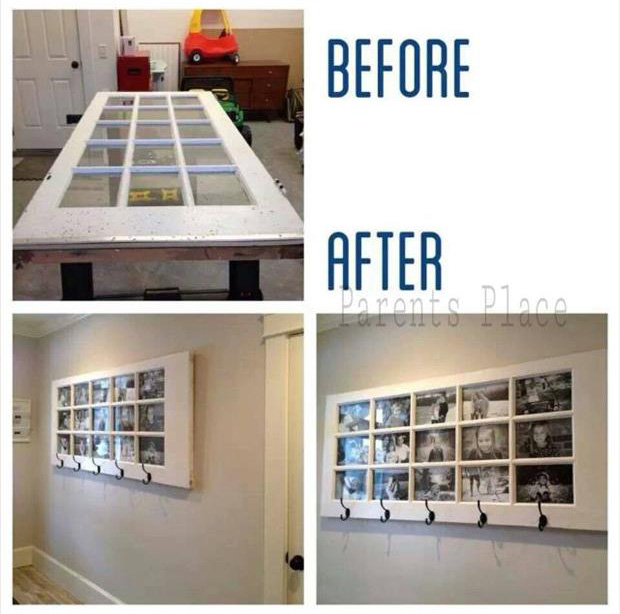
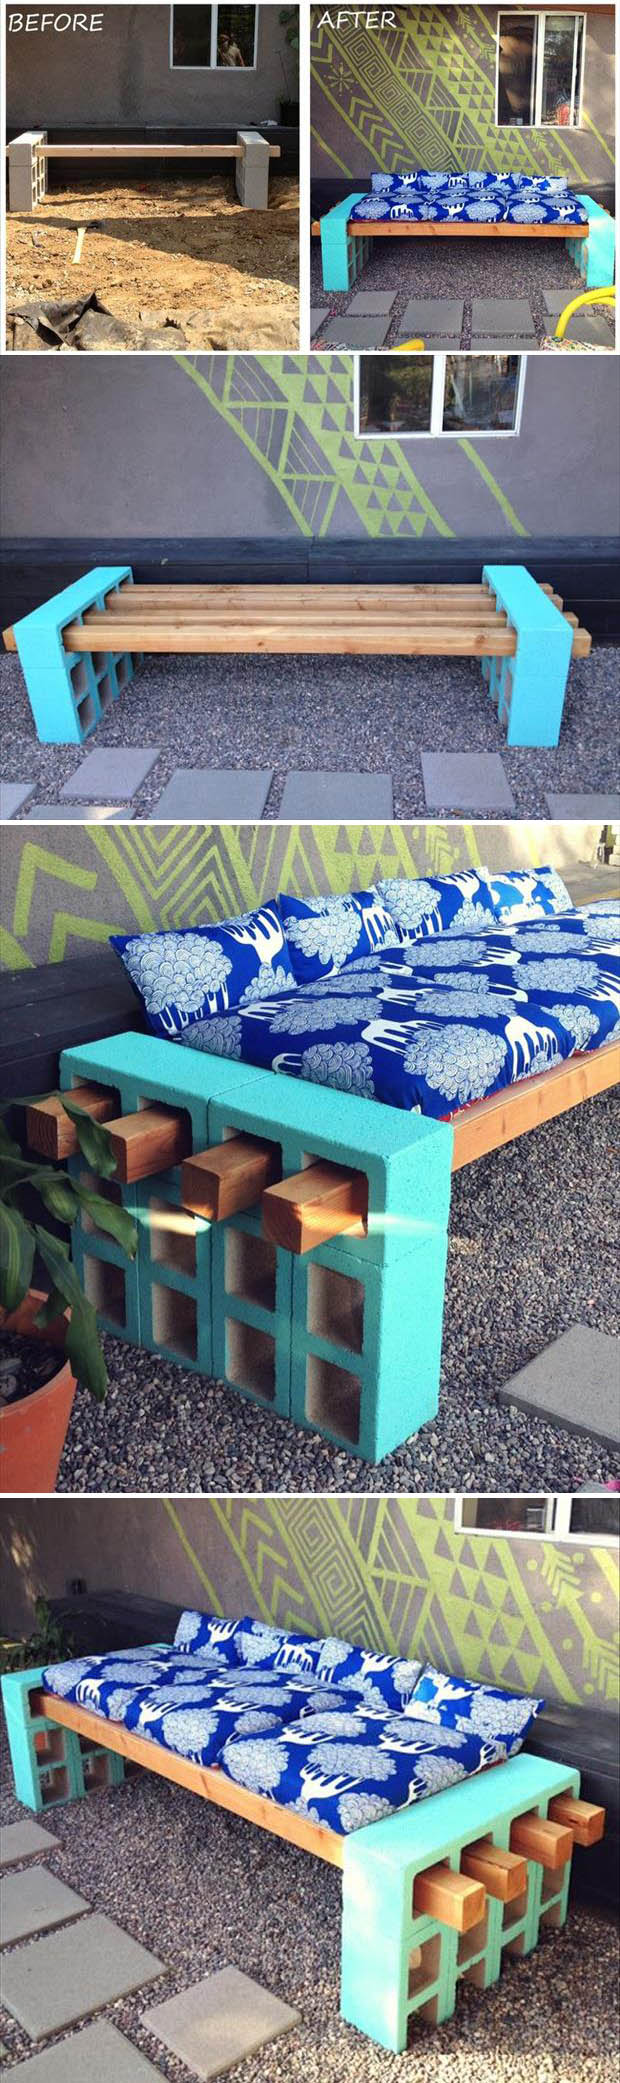
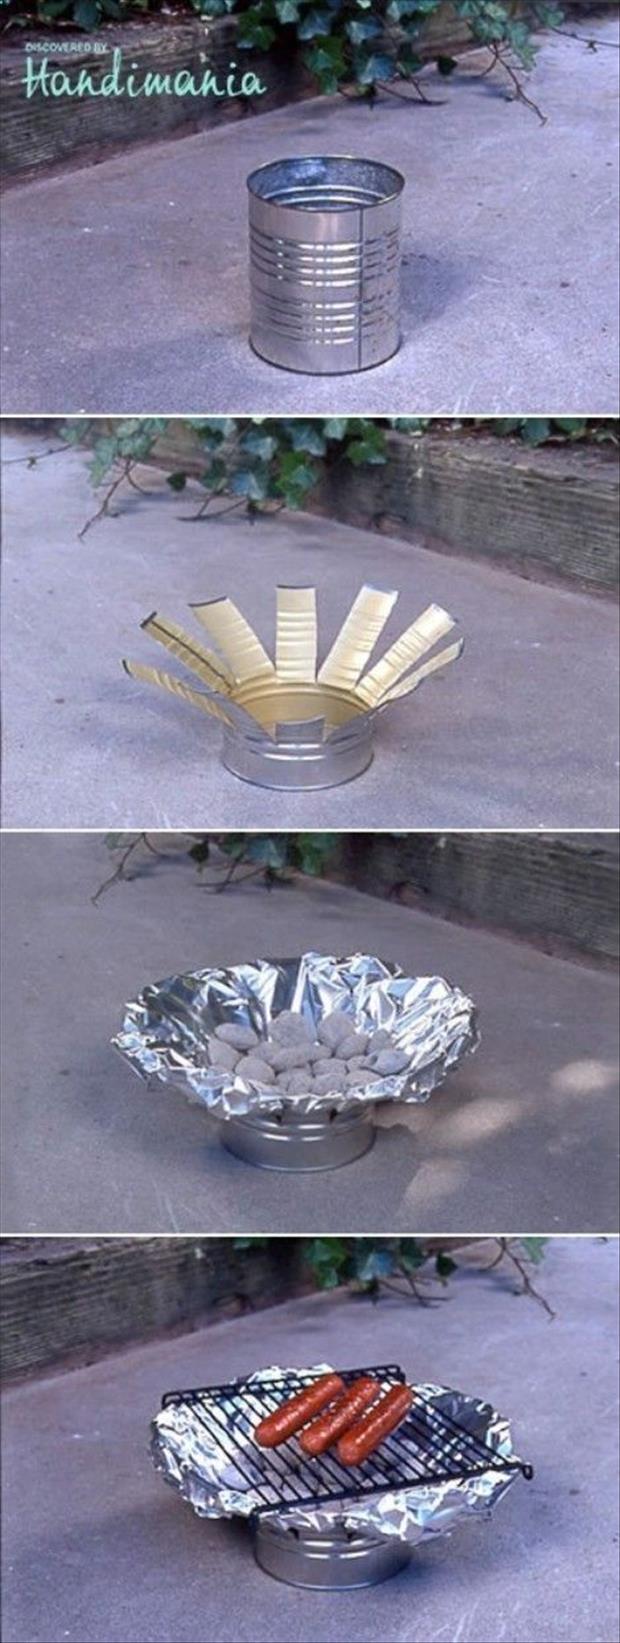


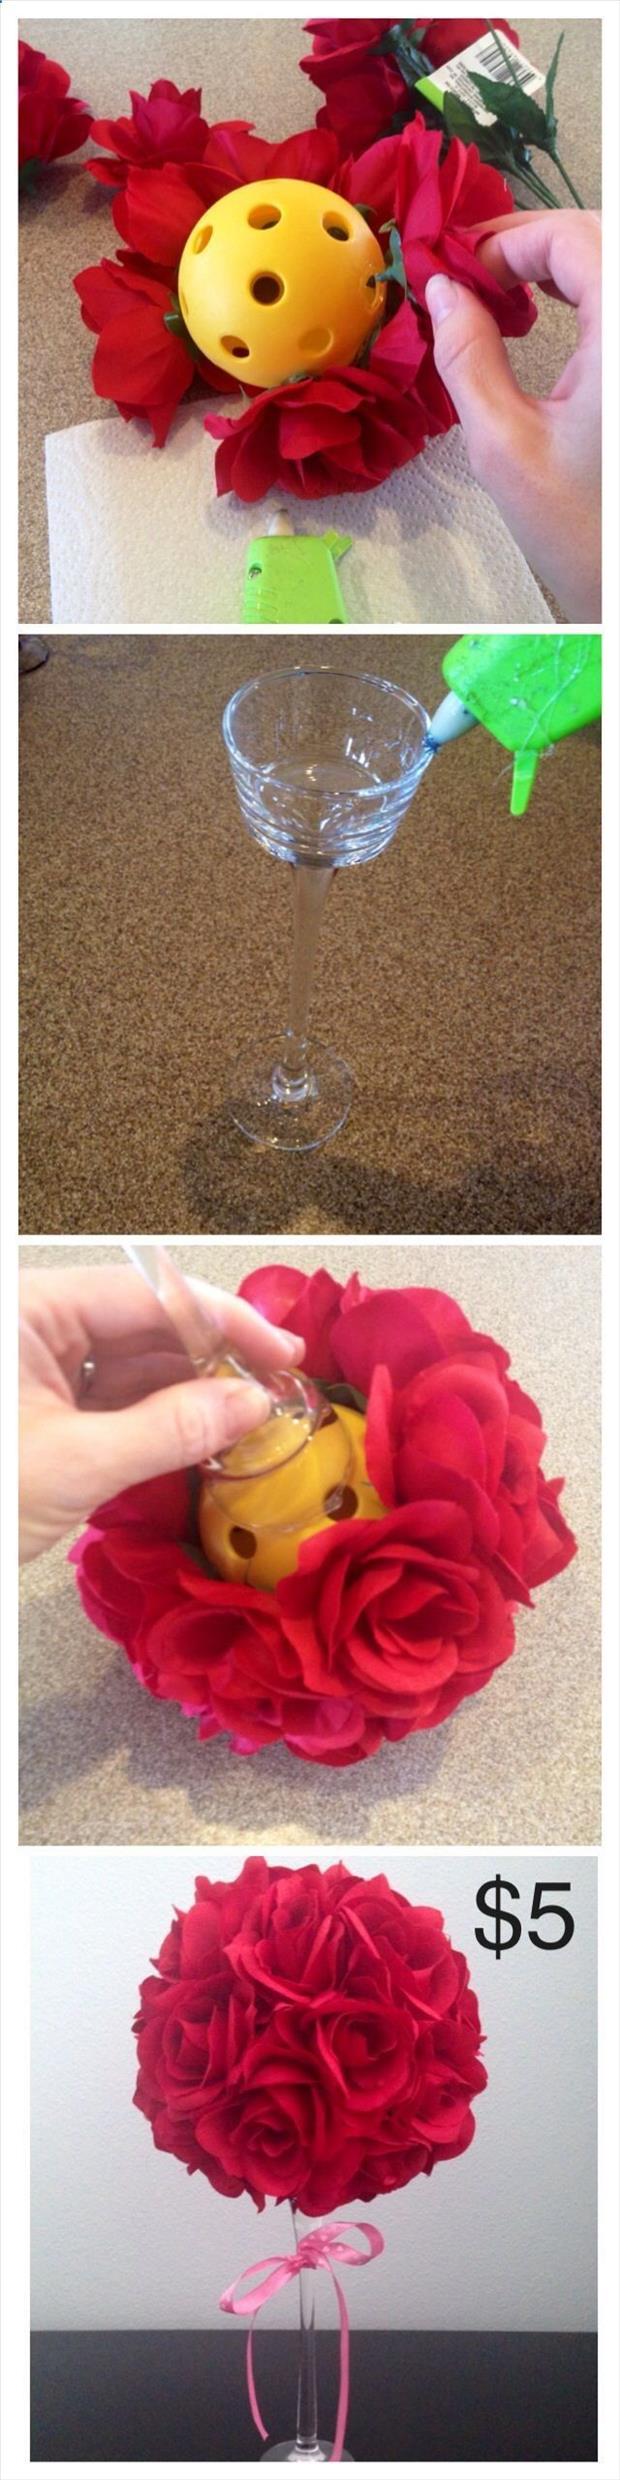


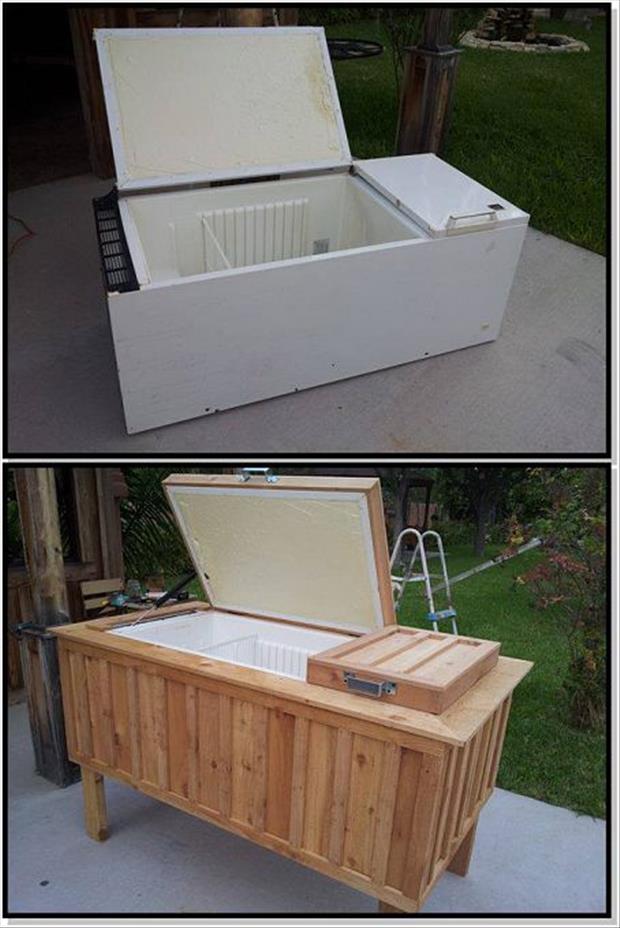


 Sources – WhereHomeStarts - GeekFill – PrincessPinkyGirl – Lenasekine.Blogspot – MakelyHome – Rashoncarraway


Meatless Balls. For this recipe, I decided on a combination of beans and mushrooms, simple seasonings and a splash of red wine really boosted the flavor too. Plenty of garlic, some onion, Italian-seasoned Panko (gluten-free) bread crumbs, other spices and some parsley. I chose pinto beans simply because
A. I had them on hand and
B. I know their brownish color would look "faux meatball" like.
..that being said you could easily use any soft bean like cannellini or even black beans. You just need to be able to mash the cooked bean with a fork. Garbanzo beans are probably a bit too firm and flaky for this recipe. The mashed beans really help to bind the rest of the ingredients with their natural stickiness.
You can also change up the variety of mushrooms you use. I used oyster mushroom, but shiitake or portobella would work too. Even plain old white mushrooms (which are a bit firm and crumbly when raw) would work since you are sauteing them first to make them tender.
Method. Yes the instructions are long, but the technique is very similar to making veggie burgers. Mash and saute. And yes you could totally form your balls and just BAKE them to perfection. (I know many of you prefer not to fry.) I did a simple saute + braised them in my sauce until warm and tender.
After saute, before sauce-dunking..
Spaghetti & No-Meatballs
vegan, makes about 8-12 no-meatballs (depending on size)
No-Meatballs:
1 1/2 cups (1 - 15 ounce can) beans, drained/rinsed in hot water
*I used pinto beans
3/4 cup white onion, diced
1/3 cup parsley, finely chopped
1 cup mushrooms, finely chopped
*try soft oyster or shiitake mushrooms
2 Tbsp red wine
1/2 cup Italian-seasoned Panko breadcrumbs (fine)
2 tsp chopped garlic(roasted or raw)
1/2 tsp salt
1/4 tsp fine black pepper
1/2 tsp chili powder (or 1/4 tsp red pepper flakes)
1/4 cup nutritional yeast (or more bread crumbs)
1 Tbsp extra virgin olive oil, for saute
Also:
spaghetti pasta (any variety)
marinara sauce (bottled or make your own, my marinara recipe)
chopped basil or parsley garnish
vegan Parmesan on top (optional)
Directions:
1. Start by opening your can of beans and rinsing the beans very well in hot water. This will help soften the beans for easy mashing.
2. Add the rinsed beans to a large mixing bowl and mash with a fork, very well.
3. Prep your ingredients by chopping the parsley, onion and mushrooms.
4. In a large saute pan, over high heat, add 1 Tbsp of olive oil. When oil is hot add in the onions, mushrooms, parsley and garlic. Saute for about 4-5 minutes, reducing heat to medium about a minute after cooking.
5. When the saute mixture has reduced in volume quite a bit and onions caramelizing, turn off heat and add in your splash of red wine. Turn heat back on to high for one more minute.
6. Just before you turn off the heat you can add in the salt, chili powder, pepper and any additional spices you may like to add. You can taste the mixture and it should be slightly "over-seasoned" since the beans have not been seasoned yet.
7. Fold the saute mixture into the beans. Then fold in the bread crumbs and the nutritional yeast. Your mixture should be quite sticky and thick now. Add more yeast or bread crumbs if your mixture needs thickening.
8. You can either place your mixture in the fridge to chill for a half hour (to help with handling, or just go right into the saute process.
9. Pause a moment and heat up your pasta water pot and also pour your pasta sauce into a large oven-friendly dish. Place the pasta sauce dish in a 375 degree oven to heat.
10. Saute your balls: Heat a splash of olive oil in your saute pan and add your formed balls. I like to roll my formed balls in a bit of the bread crumbs before placing on the pan. Cook over medium-high heat for about one minute on each side. You really just want to cook and caramelize that outside edge of the balls. The remaining "cooking" will be done in the oven. *you could also just keep it a bit lighter and simple and bake your balls. However you will be missing out on those caramelized edges from the saute step, and tender sauce spots from the braising step.*
11. Drop your pasta into the pot when the water is boiling. Cook until tender. Drain and toss warm pasta with some red pepper flakes (optional) and EVOO. Spoon about 1 cup of the pasta sauce over top the pasta and toss well. Set aside, covered for now.
12. Take your sauteed balls and carefully place them in the now-hot pasta sauce dish. Then place the pasta dish back in the oven to braise the balls for at least 20 minutes. Oven heat can be 375-400 degrees. Do not cover the dish.
13. Now for assembly! Carefully remove the braised balls from the sauce and set aside. Then in a large bowl or your serving bowl, toss the hot pasta sauce with the warm pasta. Or you can just pour sauce over top pasta and not toss. Add balls over top to serve.
Freshly chopped parsley or basil on top is very nice.

S’mores!
Harness the energy of the Sun to make the best snack ever invented.
Yummmmm!
A solar oven is a box that traps some of the Sun’s energy to make the air inside the box hotter than the air outside the box. In other words, the solar oven is like a super greenhouse.
You will need:
Cardboard box with attached lid. Lid should have flaps so that the box can be closed tightly. Box should be at least 3 inches deep and big enough to set a pie tin inside.
Aluminum foil
Clear plastic wrap
Glue stick
Tape (transparent tape, duct tape, masking tape, or whatever you have)
Stick (about 1 foot long) to prop open reflector flap. (Use a skewer, knitting needle, ruler, or whatever you have.)
Ruler or straight-edge
Box cutter or Xacto knife (with adult help, please!)
How to make solar oven:
CAUTION:
Have an adult cut the box with the box cutter or blade.
Using the straight edge as a guide, cut a three-sided flap out of the top of the box, leaving at least a 1-inch border around the three sides.
Cover the bottom (inside) of the flap with aluminum foil, spreading a coat of glue from the glue stick onto the cardboard first and making the foil as smooth as possible.
Line the inside of the box with aluminum foil, again gluing it down and making it as smooth as possible.
Tape two layers of plastic wrap across the opening you cut in the lid—one layer on the top and one layer on the bottom side of the lid.
Test the stick you will use to prop the lid up. You may have to use tape or figure another way to make the stick stay put.
Put the oven to work
Set the oven in the direct Sun, with the flap propped to reflect the light into the box. You will probably have to tape the prop in place. Preheat the oven for at least 30 minutes.
To make S’mores, you will need:
Graham crackers
Large marshmallows
Plain chocolate bars (thin)
Aluminum pie pan
Napkins!
Break graham crackers in half to make squares. Place four squares in the pie pan. Place a marshmallow on each.
IMPORTANT!
Note that unlike most recipes, our s’mores have the marshmallow UNDER the chocolate. That’s because, in the solar oven, it takes the marshmallow longer to melt than the chocolate.
Place the pan in the preheated solar oven.
Close the oven lid (the part with the plastic wrap on it) tightly, and prop up the flap to reflect the sunlight into the box.
Depending on how hot the day is, and how directly the sunlight shines on the oven, the marshmallows will take 30 to 60 minutes to get squishy when you poke them.
Then, open the oven lid and place a piece of chocolate (about half the size of the graham cracker square) on top of each marshmallow. Place another graham cracker square on top of the chocolate and press down gently to squash the marshmallow.
Close the lid of the solar oven and let the Sun heat it up for a few minutes more, just to melt the chocolate a bit.
Enjoy!

